
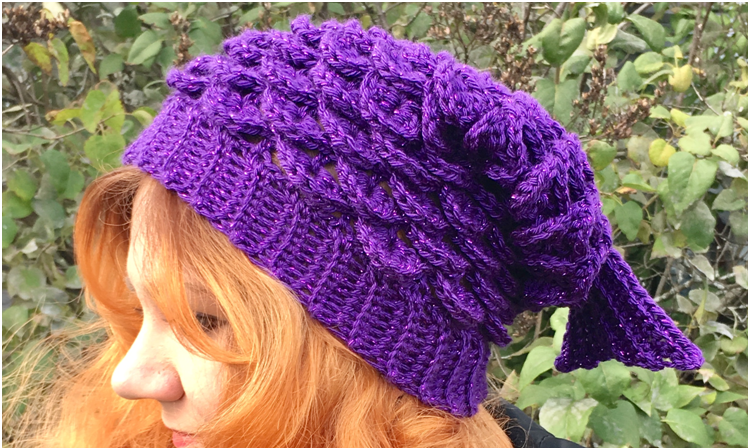
Mermaid Slouchy Hat Crochet Pattern
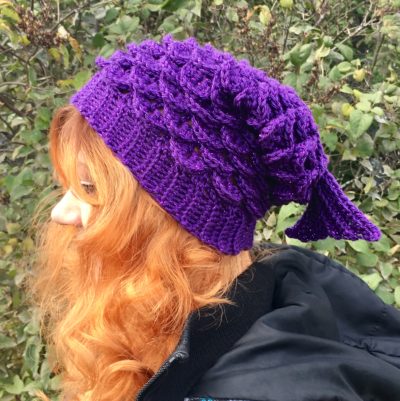
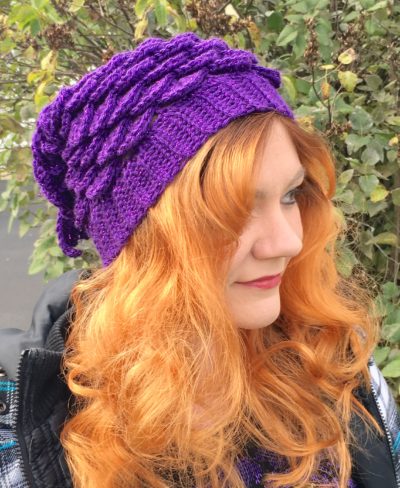
They said I could be anything, so I became a MERMAID! It doesn’t get much more magical than this sparkly, soft mermaid slouchy hat! I wanted to design a fun slouchy hat this winter that wasn’t your ordinary hat…something comfy, but striking and unique, as well. If you’ve been following my blog for a little bit, you’ve probably noticed that I’m a big fan of anything cute and make-believe (hence my obsession with amigurumi and play food!). So what better way to add some magic to an ordinary slouchy hat than to make it into a mermaid hat?!
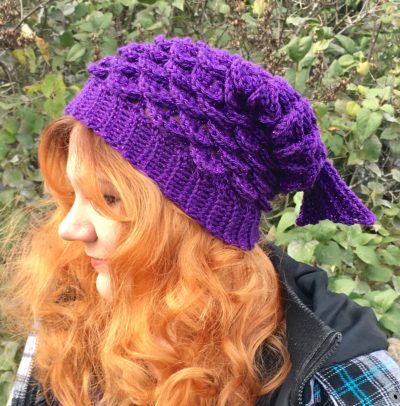
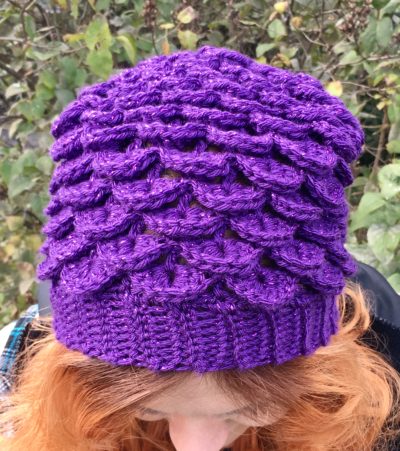
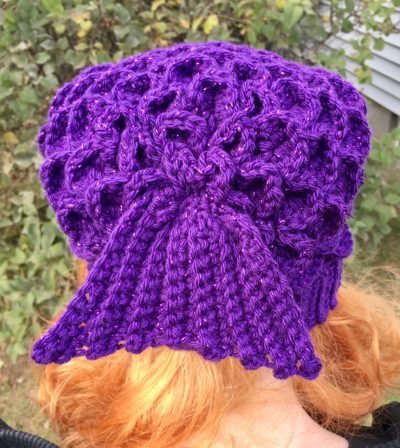
The hat is worked up using the easy and fun crocodile stitch, which is used to make the “scales” of the hat. To top it all off, there’s an honest to goodness little fin on the back of the hat – right where you would usually see a pom pom!
But the scales and fin aren’t even the best part of this hat! I knew when I was making this that I absolutely had to use a yarn that was sparkly! I quickly learned that it can be tough to find a medium-weight sparkle yarn that isn’t limited edition or seasonal. Then I came across an old favorite from my days of making sparkly shamrock scarves – Caron Simply Soft Party! This yarn has just the right weight for a soft, warm slouchy hat, and the metallic thread that runs through it TRULY sparkles! Plus, it comes in lots of gorgeous, deep colors! For this hat, I chose “Purple”. The adult size uses two skeins – find them on Amazon here!
Ready to dive into this pattern? (Get it?!) Let’s go!
(If you’d like an ad-free PDF version of this pattern, you can purchase it in my shop here!)
Supplies:
Size I/9 5.25 mm Crochet Hook
Yarn Needle
Scissors
2 Skeins of Caron Simply Soft “Party” Yarn (“Purple” color way used in photo)
Abbreviations:
Beg = beginning
BLO = back loop only
Ch(s) = chains
Dc = double crochet
Fpdc = front post double crochet
Rem = remaining
Rep = repeat
Rnd = round
Sc = single crochet
Sk = skip
Sl st = slip stitch
St(s) = stitch(es)
Size:
Cuff Circumference of about 21”; total length (before fin) of about 11”
Special Stitches:
Front post double crochet: double crochet around a double crochet post from the previous round (hook is inserted behind post so as to push the post to the “front”)
Crocodile stitch (Crocodile st) – 4 fpdc around one dc post of a 2dc cluster, 4 fpdc around other dc post of 2dc cluster.
Gauge:
2 rows of crocodile stitches=1.75”, and 1 crocodile stitch across=1.75”
Update: There is now a video tutorial on my YouTube channel for this slouchy hat!
Instructions
Cuff
Row 1: Ch 10, sc across. Ch 1, turn. (9 sc)
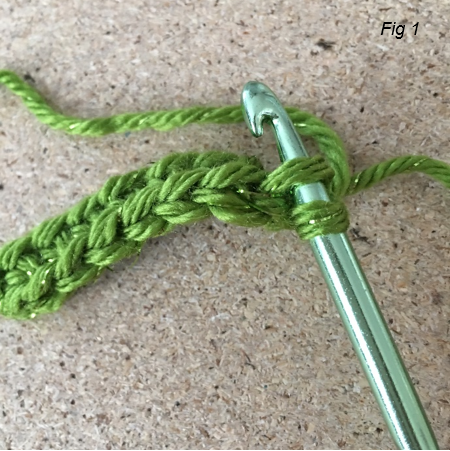
Row 2: In BLO (see Fig. 1), sc across, ch 1. (9 sc)
Rep Row 2 until cuff measures 21″ when VERY stretched – about 53 rows total (9 sc each row)
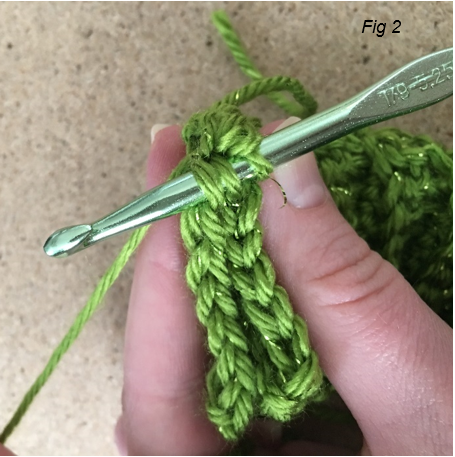
Place both ends of the cuff together, and sl st across in BLO to make join the band and form cuff (see Fig. 2). Do not fasten off. Ch 1.
Body of hat
Working around top of cuff
Rnd 1: Evenly sc 71. Join with sl st to first sc of rnd. (71 sc)
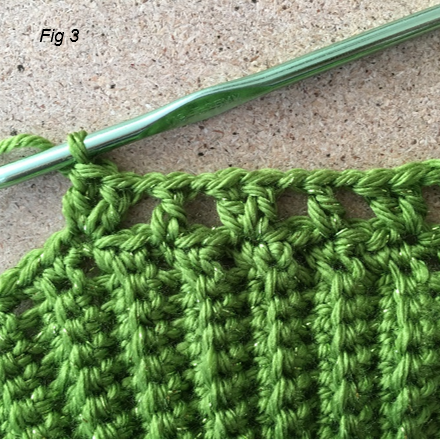
Rnd 2: Ch 3 (counts as a dc, ch 1), sk 2 sts, 2 dc in next. *Ch 1, sk 2 sts, dc in next. Ch 1, sk 2 sts, 2 dc in next.* rep from * to * 10 more times. Ch 1, join with sl st to 2nd ch of ch 3 from beg of rnd. (Fig. 3 shows dc’s and 2dc clusters.) (12 dc and 12 2dc clusters)
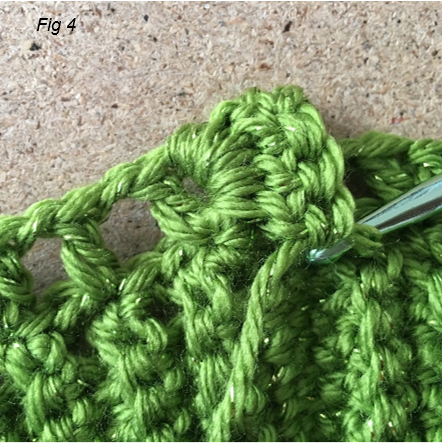
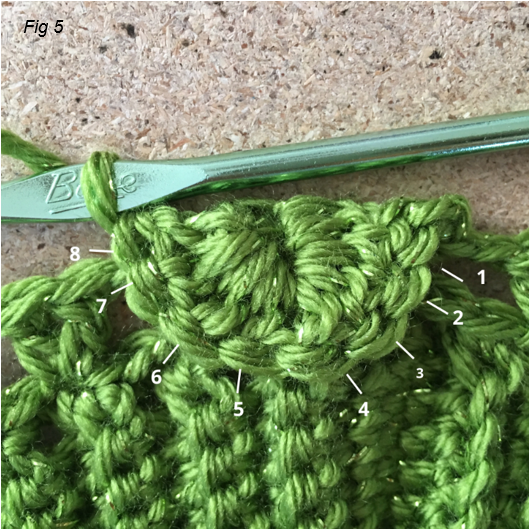
Rnd 3: Ch 1, sc in same st (first dc). *In 2 dc cluster from rnd below, 4 fpdc around one dc of 2dc cluster (Fig. 4 shows 4 fpdc worked around first post); 4 fpdc around next dc post – crocodile stitch made. (Note: to make a crocodile stitch, you will need to turn your work to dc around the second post – see Fig. 5 for order in which dc’s are worked.) Sc in next dc.* Rep from * to * 10 times. Crocodile st around last 2dc cluster. Join with sl st to first sc from beg of rnd. (12 crocodiles and 12 sc)
Rnd 4: Ch 2 (counts as a dc), dc in same st. Ch 1. *In center of next crocodile st from previous rnd, dc. Ch 1. In next sc from previous rnd, 2 dc. Ch 1.* rep from * to * 10 times. In center of next crocodile st from previous rnd, dc; ch 1. Join with sl st to top of ch 2 from beg of rnd. (12 2dc clusters and 12 dc)
Rnd 5: Ch 1. *Crocodile st around 2dc cluster, sc in next dc from previous rnd.* Rep from * to * 11 more times. Join with sl st to center of first crocodile st made. (12 crocodiles and 12 sc)
Rnd 6: Ch 3 (counts as a dc, ch 1); in next sc, 2dc. Ch 1. *In center of next crocodile st from previous rnd, dc. Ch 1. In next sc from previous rnd, 2 dc. Ch 1.* rep from * to * 11 times. Join with sl st to 2nd ch in beg ch-3. (12 2dc clusters and 12 dc)
Rnds 7 – 26: Rep Rnds 3 – 6 five more times.
Rnd 27: Rep Rnd 3 once more. Do not fasten off.
Combining/Decreasing Crocodile Stitches
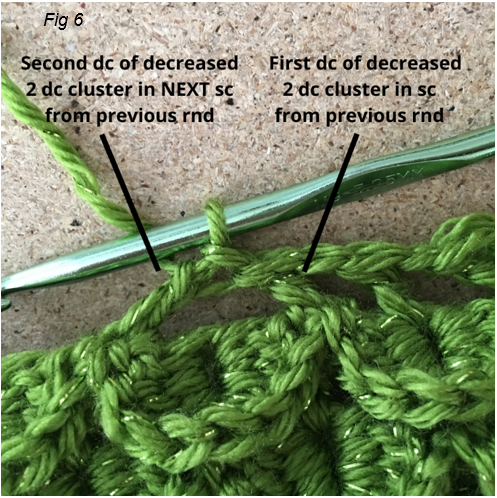
Rnd 28: Ch 2, dc in same st, ch 1. Dc in center of next crocodile st from previous rnd, ch 1. *Dc in next sc from previous rnd, and dc in next sc from previous rnd – first deceased/combined 2dc cluster made (see Fig. 6). Ch 1. Dc in center of next crocodile st from previous rnd, ch 1. 2 dc in next sc from previous rnd, ch 1. Dc in center of next crocodile st, ch 1.* Rep from * to * two more times. Dc in next sc from previous rnd, and dc in next sc from previous rnd – last decreased 2dc cluster. Ch 1. Dc in center of next crocodile st from previous rnd, ch 1. Join with sl st to top of beg ch 2. (8 2dc clusters, 8 dc)
Rnd 29: Ch 1, *crocodile st around 2 posts below. Sc in next dc from previous rnd below. Crocodile st around decreased posts from previous rnd below (see Fig 7). Sc in next dc from rnd below.* Rep from * to * three more times. Join with sl st to center of crocodile st from beg of rnd. (8 crocodile sts, 8 sc)

Rnd 30: Ch 3 (counts as a dc, ch 1), *dc in next sc from previous rnd, dc in the next sc from previous rnd – combined 2dc cluster made. Ch 1, dc in center of crocodile from previous rnd. 2 dc in sc from previous rnd. Ch 1, dc in center of crocodile st from previous rnd, ch 1* Rep from * to * once more. Dc in next sc, dc in next sc after that – last combined 2dc cluster made, ch 1. Join with sl st to 2nd ch of ch 3 from beg of rnd. (5 dc and 5 2dc clusters)
Rnd 31: Ch 1, sc in same st, ch 1. *Crocodile st around first decreased 2dc cluster from previous rnd – first decreased crocodile made. Sc in next dc from previous rnd. Crocodile st around next 2dc cluster from rnd below. Sc in next dc from rnd below.* Rep from * to * once more. Crocodile around last decreased 2dc cluster. Join with sl st to first sc of rnd. Fasten off, leaving a long tail. (5 sc and 5 crocodile sts)
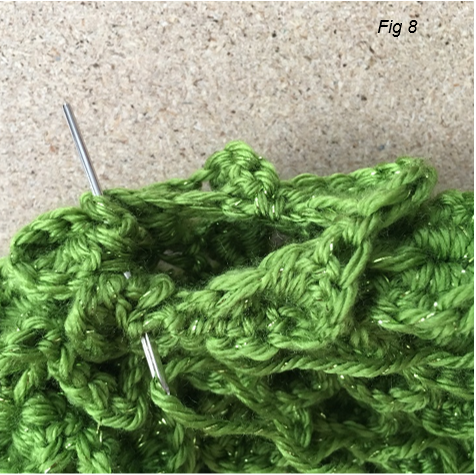
Closing top of hat
With long tail threaded on needle, gather sts around yarn needle and pull through (Fig. 8), cinching the hat closed (tie a knot to keep in place if necessary). Fasten off, carry yarn ends to inside of hat, and weave in ends.
Fin
(All rows are worked in BLO)
Ch 15.
Row 1: Sc across, ch 1, turn (14 sc)
Row 2: Sc in 13 sts, leave rem sts unworked, ch 1, turn (13 sc)
Row 3: Sc across. Ch 1, turn (13 sc)
Row 4: Sc in 12 sts, leave rem sts unworked, ch 1, turn (12 sc)
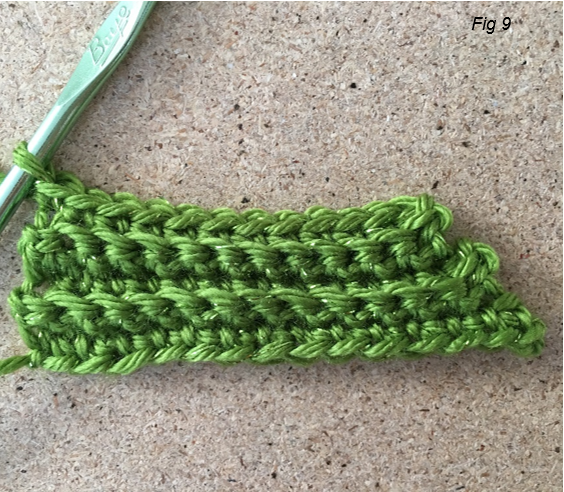
Row 5: Sc across. Ch 1, turn (Fig. 9 shows what your work should look like after this row) (12 sc)
Row 6: Sc in 11 sts, leave rem sts unworked, ch 1, turn (11 sc)
Row 7: Sc across. Ch 1, turn (11 sc)
Row 8: Sc in 10 sts, leave rem sts unworked, ch 1, turn (10 sc)
Row 9: Sc across. Ch 1, turn (10 sc)
Row 10: Sc in 9 sts, leave rem sts unworked, ch 1, turn (9 sc)
Row 11: Sc across. Ch 1, turn (9 sc)
Row 12: Sc in next 8 sts, 2 sc in last, ch 1, turn (10 sc)
Row 13: Sc across, ch 1, turn (10 sc)
Row 14: Sc in next 9 sts, 2 sc in last, ch 1, turn (11 sc)
Row 15: Sc across, ch 1, turn (11 sc)
Row 16: Sc in next 10 sts, 2 sc in last, ch 1, turn (12 sc)
Row 17: Sc across across, ch 1, turn (12 sc)
Row 18: Sc in next 11 sts, 2 sc in last, ch 1, turn (13 sc)
Row 19: Sc across, ch 1, turn (13 sc)
Row 20: Sc in next 12 sts, 2 sc in last st, ch 1, turn (14 sc)
Row 21: Sc across, ch 1 (14 sc)
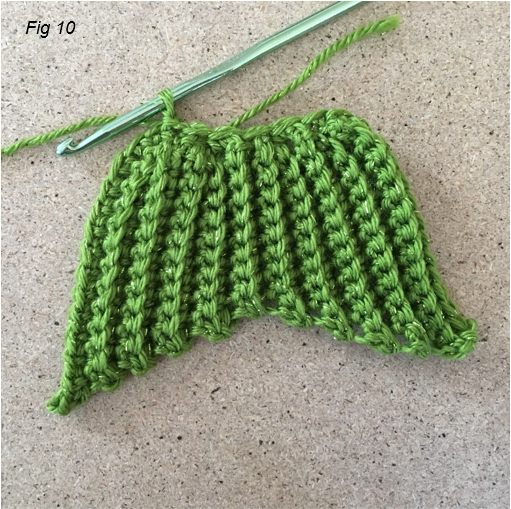
Sc evenly 6 sc across top of fin (Fig. 10). Fasten off, leaving long tail for sewing.
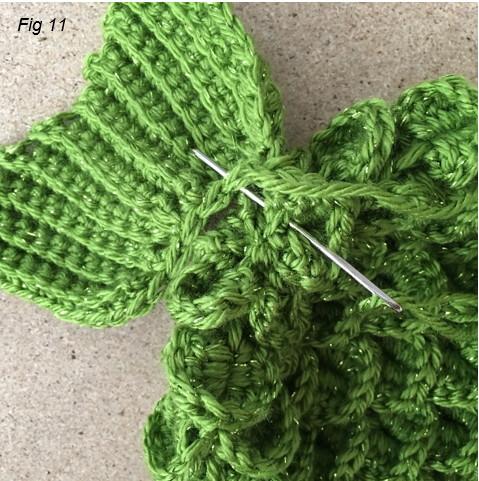
Sew fin to top of hat (Fig. 11). Carry yarn tails to the inside of hat and weave in ends.
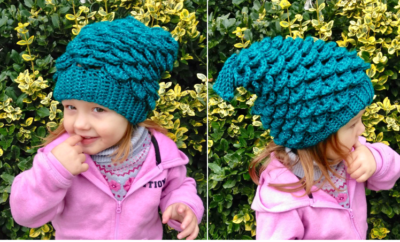
Here is the finished mermaid hat!
Thanks for joining me for this mermaid slouchy hat! And guess what? I’ll be releasing the KIDS VERSION soon! So, you can crochet mermaid hats for every kiddo you know! (UPDATE: FIND THE KIDS VERSION HERE!)
Stay tuned by following me on social media and subscribing to my email list (links/signup form are on the right)!
COPYRIGHT: This pattern is owned by Crafty Kitty Crochet (Melissa Moore). Any reselling or distribution of this pattern is prohibited. Sale of items made using this pattern is welcomed, but I do ask that credit/a link be provided back to my site, craftykittycrochet.com.
Comments (47)
Chelle
January 31, 2019 at 4:03 am
Your directions are beautifully written!! First complex pattern I’ve been able to complete
Melissa
January 31, 2019 at 11:35 am
Thank you so much, Chelle! I’m really happy to hear that! Great job – I bet your mermaid hat is amazing!!!! ^_^
cari
February 3, 2019 at 12:52 am
I have crocheted for more than 40 years and round 6 has me stumped. Do you have a video tutorial to walk me through this?
Melissa
February 3, 2019 at 1:33 am
Hi Cari, sorry to hear that! I don’t have a video at the moment, although that’s something I want to start doing in the future 🙂 I’d be happy to help clarify Rnd 6 for you though! Is there a particular part that has you stumped? The idea for that round is that you’re making a foundation for your next row of Crocodile stitches. So all of the 2 dc clusters (which you will make crocs around next row) are being made in the sc stitches of the previous crocodile rnd – so that the crocs you make in Rnd 7 will be in between the ones from Rnd 5, which creates a pretty alternating pattern of mermaid “scales”. ^_^ Hope that helps – let me know if you want to chat about it more! Happy Crocheting!
Mercedes Brown
February 4, 2019 at 7:31 pm
Hi Melissa, I just thought I would offer a little note of advice. On the crocodile stitch or ‘scales’ I found it best to add two chain stitches between the four fpdc. It let the scales lay down better and stretch better so that they were not in the way while continuing to work on the rest of the rounds up the hat.
Melissa
February 4, 2019 at 10:06 pm
Hi Mercedes! Thanks for the tip – that’s a really good idea! Thanks so much for using my pattern, hope you had a great time working up this mermaid hat 🙂
Liz
February 16, 2019 at 1:14 am
Lovely, great pattern & great directions. Making some now. Would absolutely love a Dragon tail version.
Melissa
February 16, 2019 at 4:16 pm
Thank you so much Liz!!! I’m glad you like it! And I LOVE the idea of a Dragon Tail Hat…..I might have to go work on designing that pattern in the very near future!!! Thanks for the inspiration!! ^_^
Liz.
February 18, 2019 at 12:12 am
Hi, mine seems to look a lot longer than yours, am I miss counting the number of rows? I have 16 rows of crocodile stitches in total, how many should I have? thanks
Melissa
March 6, 2019 at 2:48 am
Hi Liz! I counted 15 rows of crocodile stitches on one that I recently made, so you might have an extra row of crocs! It shouldn’t be a problem though, as long as your hat is still about 11″ in length (including cuff)!
Ninja Throwing Star Scarf Crochet Pattern – Crafty Kitty Crochet
February 17, 2019 at 10:24 pm
[…] it comes to my crochet designs. I can’t just make a hat, it needs to be a Hot Cocoa Hat or a Mermaid Hat! Well, this pattern is no different. When trying to come up with ideas for novel accessories, I of […]
Kendall
October 11, 2020 at 5:37 am
Hello, I love this pattern and just finished, and it’s too small! Apparently my head is bigger than this pattern. Adjusting the size of the cuff is no problem, but do you have any suggestions for increasing the rounds? And then decreasing them.
Melissa
October 11, 2020 at 12:44 pm
Hi Kendall, sorry to hear your hat came out too small! There are definitely some ways to adjust that! First off, you might want to check your gauge to make sure it matches what the pattern calls for; if not, you could go up a hook size or a yarn size (or both). That’s the easiest way, but if you’d prefer not to change your hook or yarn, you could increase the cuff by a few rows so that you can add more single crochet on top of the cuff. Once you do that, you should be able to add to what the pattern calls for. (For example, if you make 74 sc in Rnd 1 instead of 71, you should be able to make an additional dc at the end of Rnd 2, and an additional sc at the end of Rnd 3.) You’ll be left with an extra stitch while decreasing, but you can always just skip it or add it on top of what the instructions call for – you should still be able to cinch the hat closed at the end. I hope that helps! If you’re still having issues with the sizing, feel free to let me know here or by email (craftykittycrochet@gmail.com) and we can work on it! Thanks! ~ Melissa
Mermaid Slouchy Hat Crochet Pattern – Kids Edition! – Crafty Kitty Crochet
February 18, 2019 at 8:53 pm
[…] are such huge characters in kids’ culture right now. There’s no way I could put out a crochet pattern for an adult-sized one and not design one for kids too! So, between this pattern and my women’s version, you can […]
Mermaid Triangle Scarf Crochet Pattern – Crafty Kitty Crochet
March 31, 2019 at 8:39 pm
[…] created the concept of this scarf as a companion to my Mermaid Hat Pattern (which you can find HERE!). Eventually, I want to create tons of different Mermaid themed projects – coffee cup cozies, […]
Nadine
May 3, 2019 at 6:13 am
When making the cuff, I have a big head, so could I add a few more rows to make it a desired length? If so is there a certain number that I need to consider when making it bigger?
Melissa
May 3, 2019 at 10:55 am
Hi Nadine! Absolutely, you could adjust the pattern that way! If you’re adding a few extra rows, I recommend adding about 3 extra sts to the first rnd of the hat, then adding an extra rep to the next rnd (ch 1, sk 2 sts, dc in next). This will alter the rest of the hat as well, since you’ll have an extra step at the end of each rnd compared to the pattern. But it should add about an extra 3/4″ to the size!! You could also just move up a hook size and that will make the cuff/hat bigger automatically as well. Hope that helps – let me know if you have any more questions!!!
Mermaids – Little Family on the Mountain
May 31, 2019 at 2:05 pm
[…] Mermaid Slouchy Hat by Crafty Kitty Crochet […]
How to Make the Double Crochet Stitch – Video Tutorial – Crafty Kitty Crochet
June 23, 2019 at 11:45 am
[…] fancier stitches like the crocodile stitch – which is what I use for my mermaid projects (my Mermaid Hat, Mermaid Hat for Kids, and Mermaid […]
Tina Coats
July 3, 2019 at 7:04 pm
I was able to make the cuff but am confused on how you were able to get 71 sc in round 1 after making the cuff. If the cuff is approximately 53 rows, could you explain how I would increase to make sure that I have 71 stitches, I have done it several different ways and still come up short. I would love to make this hat just need help getting pass round 1. Any information or suggestions would be appreciated!
Melissa
July 3, 2019 at 9:36 pm
Hi Tina! Thanks so much for asking! So you are making more stitches than there are rows onto that cuff….what I usually do is make a stitch for every row on the cuff for a few stitches; then I make 2 stitches into one row of the cuff. Increasing every few stitches helps ensure that you’ll have the right amount of stitches evenly placed by the end of that first round!
Hope that helps! Thanks again!
Melissa
Tina Coats
July 3, 2019 at 11:55 pm
Hi Melissa! Thank you, that is what I was thinking but I wanted to make sure 🙂
Melissa
July 6, 2019 at 11:31 am
Of course!!! 🙂 Thanks for asking – have fun with the pattern! ^_^
Catheryn Littlejohn
July 9, 2019 at 11:33 am
Just wondering if a child’s size version is available. I love this beanie pattern!
Melissa
July 9, 2019 at 9:36 pm
Thanks so much for asking, Catheryn! I’m so glad you like my pattern!! There is a kids version available – https://craftykittycrochet.com/2018/11/23/mermaid-slouchy-hat-crochet-pattern-kids-edition/
Happy Crocheting and thank you again!
Melissa
Lisa
July 12, 2019 at 1:33 pm
Wow, this is amazing!! And it couldn’t look any better than it does with your gorgeous hair! Thanks for sharing. ❤️🤗
Melissa
July 14, 2019 at 12:55 pm
Thank you so much, you are so kind, Lisa!!! ^_^
Unicorn Circle Purse Crochet Pattern – Crafty Kitty Crochet
August 12, 2019 at 10:33 pm
[…] I love designing magical creatures. So many of my patterns are based on Mermaids and Unicorns! My Mermaid Hat, Scarf, and Unicorn Plush are just a few that come to mind. I’ve decided to indulge my […]
Mary Ann Douglas
August 14, 2019 at 10:51 pm
Thanks so much for the pattern
Melissa
August 17, 2019 at 7:22 pm
You are so welcome, Mary Ann! Thank you for visiting my site and using my patterns! 😀
Mermaid Purse – Crochet Pattern – Crafty Kitty Crochet
August 21, 2019 at 10:48 am
[…] stitch, a favorite of mine when it comes to mermaid themed projects! (See my Mermaid Scarf and Hat for more mermaid fun!) Since I love functionality in my crochet projects, I decided to add some […]
50 Beautiful and Easy Crochet Hat Free Patterns | Recycled Crafts
October 20, 2019 at 1:49 am
[…] Link Pattern Link Pattern […]
Jeanett
November 13, 2019 at 3:41 pm
I am having alot of trouble with round 28. Iam not going up with the right amount of 2dc clusters and dc. Please explain
Melissa
November 15, 2019 at 12:11 pm
Hi Jeanett, thanks for letting me know, I want to help! Round 28 starts decreasing the number of 2dc clusters. So there are a few regular 2dc clusters, and a few where you skip to the next sc/center of croc to made one of the dc’s of the cluster. The first “chain/dc back into same stitch” of the round counts as a 2dc cluster, as well. What number of clusters are you coming up with? Let me know and I’ll do my best to help! Thanks! ~ Melissa
Melissa
November 15, 2019 at 12:36 pm
Hi again, I just wanted to go over Rnd 28 a bit more specifically to see if I could help make sense of it for you!
“Ch 2, dc in same st, ch 1.” — That’s one 2dc cluster
“*Dc in next sc from previous rnd, and dc in next sc from previous rnd – first deceased/combined 2dc cluster made (see Fig. 6).”; “2 dc in next sc from previous rnd, ch 1” — that’s two more, then this gets repeated twice more. That should bring you up to 7 2dc clusters so far, including the combined ones…
“Dc in next sc from previous rnd, and dc in next sc from previous rnd – last decreased 2dc cluster.” — there’s the last one, that should make eight 2dc clusters total this round.
Was your number of clusters/dc matching the pattern up until this point? Let me know! I’m also hoping to make a video tutorial for this pattern soon!
Sorry for any inconvenience, hope we can get this figured out soon so that you can finish your mermaid hat! 🙂
Thanks,
Melissa
Mermaid Messy Bun Hat for Kids – Crochet Pattern – Crafty Kitty Crochet
January 10, 2020 at 6:39 pm
[…] a while, then you know I am a Mermaid Maniac, or a Mermaniac, if you will! My craze started with my Mermaid Slouchy Hat and the subsequent Kids Edition. The hats were so fun to make and crocheters just love making and […]
Mermaid Messy Bun Hat for Teens & Adults – Crochet Pattern – Crafty Kitty Crochet
January 17, 2020 at 11:05 pm
[…] myself (I will find a way to make this word an actual thing), as you may already know from my Mermaid Slouchy Hat, Mermaid Scarf, and Mermaid Purse. And trust me, there are more mermaid designs coming […]
Merlissa the Mermaid – Amigurumi Crochet Pattern – Crafty Kitty Crochet
May 29, 2020 at 6:01 pm
[…] I equally adore crocheting them! Take your pick of any one of my several mermaid designs – my Mermaid Slouchy Hat, Mermaid Scarf, Mermaid Messy Bun Hat, or even my Mermaid Flip Flops – and you’ll see […]
Mermaid Hand Sanitizer Cozy – Crochet Pattern ~ Crafty Kitty Crochet
November 12, 2020 at 8:15 pm
[…] you might know already from reading my blog, I am a mer-maniac! My Mermaid Slouchy Hat, Mermaid Messy Bun Hat, and Mermaid Scarf (among many other projects) are proof of that. So when […]
Mermaid Spa Day: Clamshell Scrubbies Crochet Pattern ~ Crafty Kitty Crochet
January 16, 2021 at 7:44 pm
[…] I’m shocked I haven’t just become a mermaid! If you love mermagical patterns like my Mermaid Slouchy Hat, Mermaid Messy Bun Hat, and Mermaid Easter Basket, then prepare to love being pampered by these […]
Sunflower Mermaid Blanket – Crochet Pattern ~ Crafty Kitty Crochet
May 29, 2021 at 4:03 pm
[…] So many of my designs – such as my Sunflower Afghan, Sunflower Placemats, Sunflower Coasters, Mermaid Slouchy Hat, Mermaid Hand Sanitizer Cozy, and Mermaid Triangle Scarf – involve these two pretty motifs. So I […]
9 Fun & Awesome Mermaid Patterns – Christina
July 1, 2021 at 4:16 pm
[…] Mermaid Slouchy Hat – Free Crochet Pattern – Designed by Crafty Kitty Crochet […]
Santa Mermaid Tail Blanket – Crochet Pattern ~ Crafty Kitty Crochet
December 5, 2021 at 7:30 pm
[…] up my sleeve this holiday season! I’m pretty obsessed with mermaids, as you might know from my Mermaid Slouchy Hat, Mermaid Messy Bun Hat, Mermaid Christmas Stocking, and even my Sunflower Mermaid Blanket! So […]
Christmas Tree Beanie – Crochet Pattern ~ Crafty Kitty Crochet
December 16, 2021 at 12:15 am
[…] season, and as soon as I saw them on the rise of popularity this year, I instantly thought of my Mermaid Slouchy Beanie and how fun and easy it would be to mod it into a Christmas Tree! And so, this festive delight of a […]
Amigurumi Mini Mermaid – Crochet Pattern ~ Crafty Kitty Crochet
May 28, 2022 at 7:22 pm
[…] no secret that I LOVE mermaids, and try to make as many mer-magical designs as possible! From my Mermaid Slouchy Hat to my Mermaid Christmas Stocking, and SO many patterns in between, I’m definitely hooked on […]
9 Fun & Awesome Mermaid Patterns – Creative Snugglies Designs
August 16, 2023 at 10:24 pm
[…] Mermaid Slouchy Hat – Free Crochet Pattern – Designed by Crafty Kitty Crochet […]
11 Crochet Slouchy Hat Free Patterns – Free Crochet Patterns | Plush Fiber
June 22, 2026 at 7:25 am
[…] craftykittycrochet […]